Tuesday, March 15, 2011

framing material

   I just moved in to a new apartment and in the midst of paying for rent, utilities, filling up my fridge and buying dog food - my budget is super tight!  However, I won't let that stop me in my pursuit to decorate! I've been working on a few projects but it'll take me some time to put them on here, but here is one that is so easy it took me about 10 minutes and $7 (only because I had to spray paint my old frame)!
   What I used: an old frame that I found, material (found at Hobby Lobby- way on sale!), and scissors.
 And it's as simple as this: use the cardboard, paper, mirror or whatever is in the frame to cut a piece of material to fit inside the frame and place it in the frame.  

   I hung this framed material above my cabinet in my bathroom and I think it adds a fun touch.  My apartment is still in the works so stay tuned for pictures of my new place.  
   Thanks to my wonderful boyfriend and parents, all my stuff is here and looks great! :)  


I'm off to do more decorating,

E

Wednesday, March 2, 2011

jewelry twig

   This is such a fun idea that is in almost every store right now!  At bed bath & beyond you can get a really nice "jewelry tree" for around $35 but this project cost me $6!  I took my dog, Henry on a walk the other day and literally picked up a twig on my way home :)  It was a little wild but after I trimmed it up, here is what it looked like.  This is the best part, because it's free!  Now, I will say that the tree I picked my twig from had unusual bark (and I'm not tree expert so hang in there with me).  The bark was very smooth and was easily bent, not crispy and hard like you would expect.  I would recommend getting a harder twig because my twig may not last very long :(

   After you find the perfect branch, you have to let it dry for a few days. And feel free to trim your twig down to be as big or as little as you would like.  When my twig was as dry as it was going to get, I coated the entire thing in 'Kilz' which is a sealant (found at walmart) that you can use on wood!  'Kilz original' shows up white on wood so it was perfect for my project.  The Kilz dries pretty quickly, so just make sure that your entire branch is covered.


   The last step is to find a base and drill a hole to hold the twig upright.  I got lucky in the fact that my mom has a random wood stash in her garage so I found the perfect base for my project.  If you don't have a mom who stores wood in her garage you can go to home depot and get the perfect piece of wood.  I used Krazee glue to secure the twig to the base and then coated the base in the same Kilz that I sprayed the twig with.

   Once everything is dry, you have a new jewelry twig that is completely original!


All in an afternoon's work :)

E

Tuesday, March 1, 2011

skeleton keys

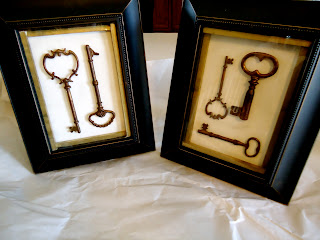
   When I was shopping at Hobby Lobby I saw a picture of skeleton keys posted on a shadow box and this sparked an easy idea for me!  I personally think shadow boxes are so expensive, and with my limited budget I just couldn't justify a $20 frame.  I found a $6 frame in another isle that had ample room between the glass and the backing, which would fit skeleton keys perfectly!  I had the hot glue sticks already, so all I needed was a $.59 sheet of textured scrapbooking paper, skeleton keys (which as a set were $5.50), frames, and $.79 balsam wood trim to add a little oomph :)

   I spray painted the wood trim a metallic gold to offset the frame with the keys.  Once they were dry, I sawed them (yes, sawed!) to fit as the border inside the frame itself.  I also measured the scrapbook paper to fit inside the border.  

   I hot glued the actual keys to the fitted scrapbook paper.  Once everything was dry and glued I assembled my pieces to look like this!

   
   I just love this look!  So classic and simple.  My total cost for this project was around $15, which is nothing near what you would pay for this look at any home goods store.


Now, all I have to do is find the perfect place to show off these beautiful pieces!

E